Well, here's my first piece that's part of my ReSTOREd Series - The Seed Money Challenge. If you're wondering what the frickety frack I'm talking about - click here and you'll get all the deets on my latest challenge. On the second thought - check that out in a second - you don't want to miss the goods on his piece!
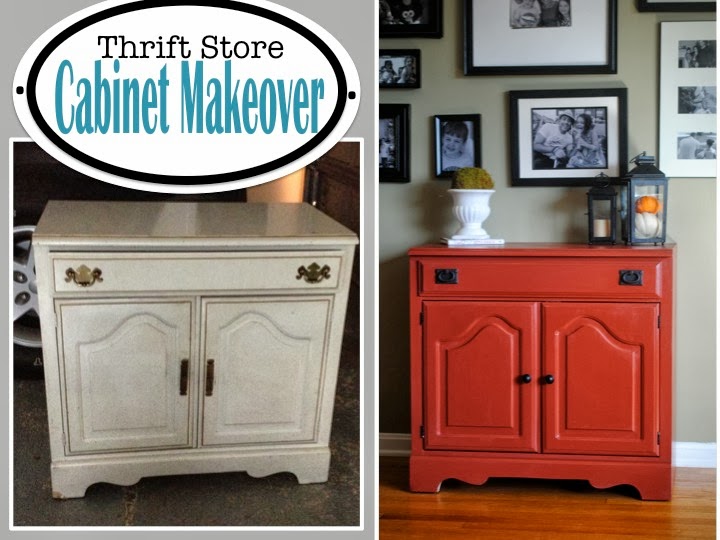
I picked up this piece a few days ago from the thrift store and she was looking a little sad to say the least. I knew I wanted to paint her red - mostly because if she didn't sell, then at least she would match the decor in my house.
I started by taking off all the hardware it was kind of dated. I'm being too nice. It was downright ugly and old.
So this is really freakin' exciting...we're co-hosting our first ever link party. We're so honored Allison over at Dream A Little Bigger asked if we'd like to party - like, why, of course! If you're like I was...oh, about 3 months ago... you're probably like "a what?" (Or perhaps you're a seasoned link party vet - and in that case WOOHOOO we couldn't be happier to have you join us at the party!) Trust me, it's awesome...especially if lots of people join the party and share their latest and greatest DIY, craft, cooking, and home projects! The more the merrier so go ahead, show us what you've got by sharing a link or two or three to your blog!
And don't forget to check back later this week when Allison and I pick a few of our favorites to feature. Alrighty, already...let's get down to business.
The RULES – because a world without rules is chaos:
Link anything you made yourself but nothing that is
available for sale. (you don’t have to have a blog or site just leave
that bit empty or link up your Facebook profile, etc.)
Link back to Dream a Little Bigger and/or Two It Yourself to be considered for next week’s feature roundup! (you can grab that awesome button up there – hubba hubba!)
Click through one or two of your favorite links and leave some comment love!
Entries are randomly placed so that everyone gets
top billing. I HATE when I get to a party late and my links get stuck
somewhere in the middle! Well, that’s not gonna happen here, folks!
It's fall and that means it's boot weather. I must have acquired about five new pairs of boots last year and already they're spilling all over the floor of my tiny closet (you know the one that's about to get even smaller due to our master bathroom renovations). Anyway...this boot debacle calls for some organization in the way of a DIY boot rack.
Boot racks or boot stands sell on the cheaper end at
stores like Target for about $25. Martha Stewart's version goes for
upwards of $99 (are you kiddin' me?!).
This baby, my friends, cost me just a few dollars and about 15
minutes. It was seriously the easiest and fastest project I've done
in awhile....meaning like I squeezed it between two blog posts, lunch,
and folding clothes during one nap time!
I already had everything on hand, but if you don't just pick up some lumber for the base (a 1x6 would be perfect) and a large diameter dowels. Mine were all different sizes, because like I said, I just scrounged up what I could find lying around the basement and the garage.
Hey guys - Melissa here. So I have some big news... basically I'm issuing another challenge to myself. Apparently, I like to challenge myself...perhaps you remember my crazy $100 bathroom makeover challenge? Did we get it done or what? You betcha and we came in under $85 for new lighting, paint, beadboard, trim, a window treatment and storage.
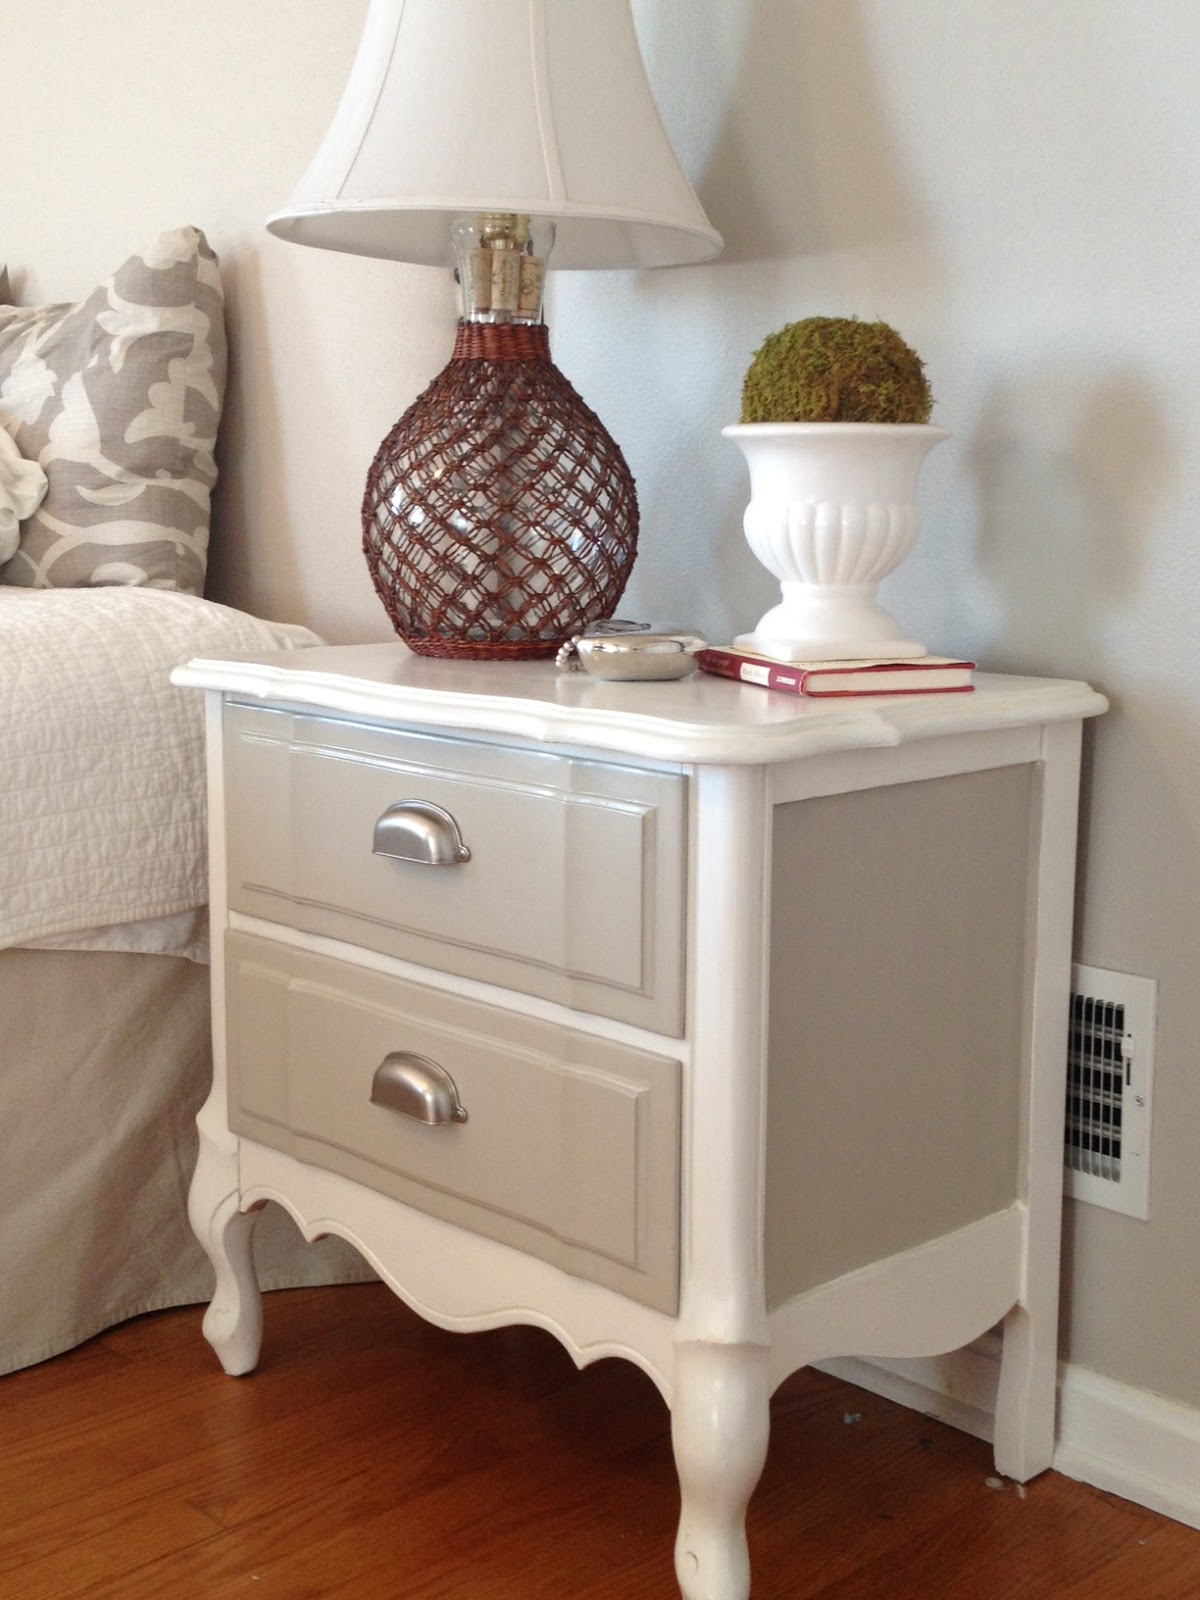
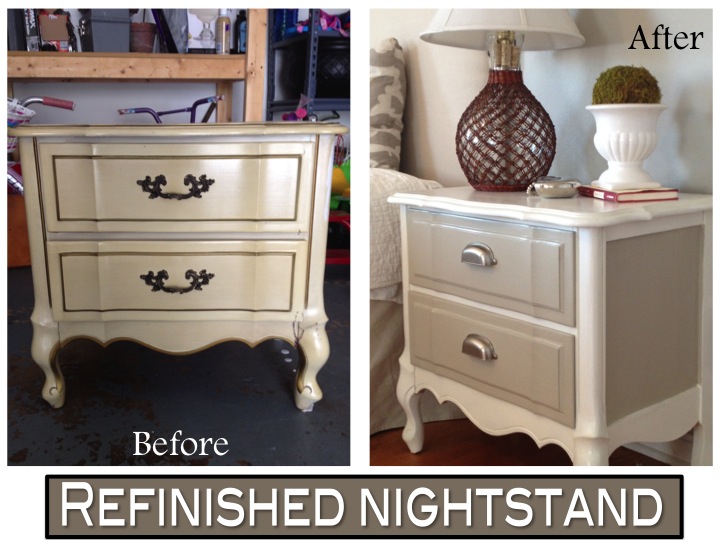
So now I'm giving myself another challenge. This one was inspired by the nightstand I recently repainted and rebeautified (is that a word?). I'm thinking this challenge is going to be a little tougher than than first, but I think I'm up for it. I hope you'll follow along since I'll be blogging all about my challenge in a new series launching NOW on Two It Yourself.
I'm going to take the money we made at our recent yard sale and use it as "seed money." Here's the challenge: more than triple the starter money by the end of the year. Okay so here's the deets. We made about $140 at the yard sale. My plan - which is already partially in motion - is to use that money to turn thrifted or unwanted pieces of furniture into a profit by refinishing and/or repainting them and reselling them.
Since I am basically giving myself three months to turn $140 into more than $400 I have to get moving (and sanding, priming, painting and selling.) Lucky for me, I've already purchased my first three pieces. One is a small cabinet piece that's so versatile it could be used in an entryway, as a TV stand, a small dresser, or even a baby changing table. Can you see the potential? I know it's tough when you're this...dated? Okay ugly, we'll go with ugly.
But she's already looking better right? And wait til you see the new hardware! She's gonna be awesome!
The other pieces were a great score - a set of matching nightstands or side tables. Here's a little sneak peek. These babies will be up for sale soon...looking more beautiful than ever! Hopefully they sell fast because the hubs isn't liking that I'm taking over the garage with all this "stuff." (Ahem, perhaps you shouldn't have thrown out the seed money idea, honey!)
The new series will be called ReSTORED...get it I'm restoring them and then basically re-STORE-ing them. Okay, maybe I'm over-thinking the name and trying to be too cutesy, but you feel me, right?! Great. Now I'm off to work....
Thanks for stopping by 2IY! If you like what you see, we'd love for you to pin it!
My fall wreath needed a makeover. The bones were fine - the grapevine wreath and the colorful fall flowers - but I just wanted something fresh. I recently saw this adorable fall wreath idea that included a mini burlap banner and I instantly loved it. I knew I could easily and quickly make the same thing.
I started by taking my original wreath apart. I apologize for not taking any "before" photos in my haste to get started on my new DIY fall wreath. You'll just have to believe me that it wasn't too bad, but it did have more flowers than the updated version.
(Keep in mind, I didn't buy anything new for this wreath, I just used what I had on hand to make it new again.)
Now that my dining room is clear of all the yard sale stuff that had swallowed it over the last few weeks - I can finally see my table again. That inspired me to decorate our large dining room table for fall. If you follow along 2IY often you might notice a trend - I tend to shop my house before I shop anywhere else. That's exactly what I did for my fall table decorations.
Why bring some ordinary slice and bake Halloween cookies to the party when you can bring these adorable little guys! I mean come on...you know you want some Halloween Cake Pops (or at least your kids do!)
Inspired by cake pop master Bakerella
and my friend Linsey who made an entire barnyard of super cute farm
animal cake pops for her son's birthday a few years ago, I decided to make my second
batch of cake pops.
Recently our mom and her siblings sold our late grandparents' beach house. Of course, first came the challenge of emptying the place which had a lot of mis-matched, antique, and vintage furniture. All of the kids and many of the grandkids - including both of us - took a few things which made for some really awesome refinishing and repurposing projects like my tool box to herb garden and nightstand to entry table. Stephanie scored this vintage two-tiered drum table.
Let's be honest, it's not much to look at. In fact, even the bargain price at the estate sale didn't attract a buyer...but their loss was Steph's gain. She took the table apart and gave it a fresh coat of paint - spray paint, to be exact!
A few weeks ago I landed this table for the grand ol' price of FREE! She was in great shape and actually not too hard to look at - just not really my style or in line with my bedroom decor. The best part (aside from the price) was I have been needing a nightstand as we only have one - and of course we have two sides of the bed.
You may remember from my master bedroom makeover that I was temporarily using my tiny childhood nightstand borrowed from my mom's house. No more, people, no more!
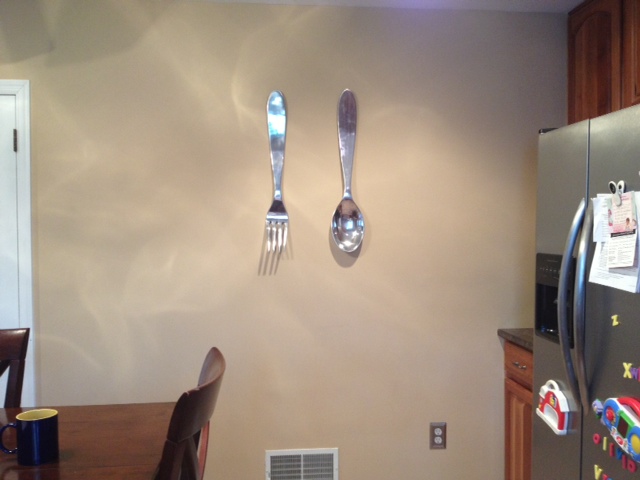
I have a huge wall in my kitchen that for nearly two years was just screaming that it was naked. I tried to save the poor thing by picking up these Pottery Barn-inspired over-sized fork and spoon from Target, but even they were lost on the wall. They were both on sale so I got the set for about $35.
Since they look ridiculous like this....I took it one step forward and in a two-for-one move added EAT on three large canvases It's basically a direct message to my kids...EAT! (I may soon sub it out for SHH...but I digress.)
I already had the canvases on hand. But how to get the letters on there neatly would be the biggest challenge. I experimented a little bit with getting the letters on the canvas until I finally figured out the perfect technique for getting straight lines.
Let me just start off by saying that after paying $130 for a doll...I wasn't about to spend just as much on her bed. No ma'am. Sorry. Not gonna happy. Not now. Not ever. But if you've been following along on Instagram you know I have been working on a DIY doll bed for Miss Rebecca - my 5 year old's first American Girl.
I'm not really a furniture maker. And by that I mean I don't really have any clue if what I made would actually hold a human if made to scale. I mean I did make a shelf out of pallets for my bathroom so I guess I can cut and screw together a few pieces of scrap wood to make a doll bed for an 18" doll, right? Here's to hoping....
This thing doesn't look like much..and that's because it's not really. It's just a few pieces of wood I had lying around the garage put together enough that my 5 year old is satisfied that her dearest Rebecca doesn't have to sleep on the hardwood floor (gasp!) or even worse her bed. Can you imagine?!
Okay so there's not really a tutorial here so I'm gonna let the pictures do most of the talking....
Okay, so before I explain all this to you, let me just tell you that I learned how to cut trim with a miter box saw the hard way - by screwing it up. I quickly learned that not only do you have to pay attention to the angle of the cut, which is determined by the corner, you also have to be careful about the way you position the piece of wood in the saw.
Since my recent $100 $84.41 bathroom makeover was my first go at it and I
screwed it up, I had to live with my mistake and fix it as best as I
could so I didn't blow my budget.
But now I'm here to tell you how to use a miter box saw correctly so you don't screw it up and end up with this...
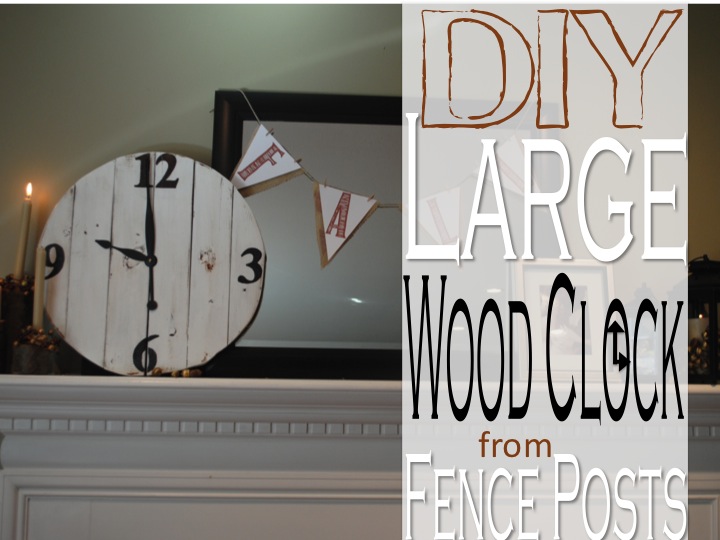
I am so excited to finally be able to share my DIY clock with you all. I have been working on the clock for the better part of the month - not that it took that long to make - it really didn't take long at all. I was trying to find cheap DIY clock parts and that was a bit of a struggle. The whole point of me making a large wooden clock myself was to keep costs down, but DIY clock kits combined with shipping can be kinda pricey. All the details on where I found the cheapest clock hands and movement in a minute, but first let's get to how I made the clock.
I started with three fence posts (or are they fence panels?) that were just sitting in the back area of my basement. Pallet wood would also work...or you can buy lumber at the hardware store, of course.
Oh, how I love when the season changes and my decor must change with it. If you've been following along you know I've been working on a few natural elements for my fall mantle like these Pottery Barn knockoff tree branch candle sticks and these gold spray painted (properly cleaned and dried) acorns. I also recently picked up a big ol' white wooden pumpkin at TJ Maxx for the floor next to the fireplace, but I still felt like something was missing.
I decided to take a note from my July 4th burlap banner and make a FALL banner to complete the look. My mirror above the fireplace isn't too large which is why I went with 'Fall', but if you have a larger space, you could also make an "Autumn" banner/bunting.
Not wanting to let about a quarter yard of this beautiful fabric (it's Pom Pon Play Spa by HGTV/Walvery) go to waste after creating my 15 minute window valance for the powder room, I decided I would make some cheap wall art with the rest. This is a really easy project and one that even the kids can help with - provided you don't mind cleaning up a little mod podge.
You'll need a few shoe box lids in various sizes, mod podge, a sponge or paint brush, a hot glue gun, and a few clips are helpful - but not necessary. I stole four shoe box lids from the closets in our house. It turned out I only had enough fabric to cover three - actually I kinda cheated. My fabric would really only cover two because of the large size of the lids, but you know the cardinal rule of decorating don't you - arrange things in groups of three or five.
In order to cover three lids I actually cut two of them in half and then slid both halves back together so they would be a little narrower. I just used a some tape to hold them together. Now that they're covered in fabric you can't even tell that I hacked them.
You guessed it...it's another addition to the $100 bathroom makeover. This was actually an edit that I made after being unhappy with the original stenciled drop cloth valance I made. The drop cloth curtain didn't cost me anything because I already had the drop cloth, but this guy only cost me $4.25 (the cost of half a yard of this gorgeous HGTV/Waverly fabric between a sale and coupon). I'm certainly glad I splurged because this little piece of fabric makes the bathroom for me!
Unfortunately, I didn't take many any pictures as I made the new valance because I was kind of just wingin' it, but since I've had a few requests for the tutorial I'll try to explain how I did it as best as I can using a few graphics.
The curtain rod (aka dowel) was already hanging over the window so the
easiest way for me to measure how wide I needed my valance was to
actually mark right on the rod the inside points were the rod holders
hit. My window measurement came to 27".
A half a yard is 18 inches and the fabric comes standard 54" wide on a roll, not a bolt. Let the graphics parade begin...
Move over red, white, and blue...my fall decor is coming out. This year I'm taking my fall mantle to a whole new level of awesomeness...or should I saw autumn-ness? My tree branch candle sticks have been sitting up there a little lonely so last week I took the kids out for a walk to collect acorns...and did they ever!
You would thought I gave them free reign in a candy store -
they were ecstatic to collect acorns. We have tons in our
neighborhood and the biggest and oldest oak tree of all is right across
the street.
My kiddos spent no less than an hour picking up the biggest and best green
acorns. My daughter was very meticulous only picking out the perfect
acorns, while my son pretty much looked for anything that wasn't
"crunchy" (AKA run over by a car). As you can see they did an awesome
job.