As we round out 2013, I thought it would be a good time to look back at 2IY's top 10 most popular DIY projects of the year.
I am often surprised by what 'takes off' or goes viral on social media and on the blog. Sometimes I post something and think, "Wow, this is gonna be really popular" and then it's a flop. Other times I think "Well, this is interesting to me, but I wonder if anyone else will really care" and then it goes wild with pins, retweets, and shares.
So, to all of you who continue to visit and read and share the ideas we've shared here on Two It Yourself, I thank you for helping make this little blog so successful since our launch not that long ago in April 2013...
And now here were our Top 10 Most Popular Projects/Posts in 2013:
Alright, you guys..I know you're gonna be shocked, but I'm back with another burlap project. I made a little Let It Snow burlap banner to get me through the winter, even after I take all the Christmas decorations down (that's the worst, isn't it?).
I'm making this bunting super duper easy for you, by giving you the free printables. Even if you don't have burlap, this would look awesome printed on paper. Alright, lets get started.
We're BAAACCCKKKK! So the dust and the wrapping paper have barely settled around my house, but I'm happy to report I'm back on the blog...and back at the party! As always, Amy from Delineate Your Dwelling, Allison from Dream A Little Bigger and I are thrilled to have you partying with us for the last Link It or Lump It Party of 2013! Since we extended the party for a week over the holiday, I'll be picking a few extra features this week. Of course Amy and Allison will also be picking their favorites as well, and featuring them on their blogs.
Here's a quick look at what we were up to around Two It Yourself last week...Gotta love scheduled auto posts (sneaky, sneaky we are at 2IY).
Isn't it lovely? I love Pottery Barn's table settings. They're often simple yet stunning and timeless. What I can't swallow is paying $12.50 for a charger. Not a plate...a plate that holds a plate. Note "a". That means if you want to set the table for six you'd be spending $75 on plates you don't even eat off. Let's not talk about if you're setting the table for 12 or more...
That, my friends, is why I love the dollar store. Right before Christmas I went in looking for some gold chargers for my Christmas table. I found them for one dollar a piece. Guess what...they even have the beaded edge, just like Pottery Barn's. I picked up six...you know, for $6.
I just got paid the biggest compliment. A Two It Yourself reader left a comment on my Pottery Barn-inspired DIY Monogrammed Wine Bags saying she thought my version was actually the Pottery Barn bag. Wow! Amazing...and to think I made my wine bags with a....drop cloth.
My husband and I recently hosted a small dinner party for about four other couples. Since I wasn't doing much in the way of decorations - my house is already decked out for Christmas - I decided I would just do a few extra special party decorations. I had been given a free trial upgrade by PicMonkey to use their Royale Package I decided to make a Faux Chalkboard Menu Board. It came out awesome - despite my misspelling on Nutella (sorry 'bout that, 'Tella- I hope we can still be BFFs). More on why I didn't fix it in a minute...but first how I made it using PicMonkey.
I started by "creating a design." Since I was printing it at home and wanted it to be as large as possible, I selected the 8 x 10 canvas. Using the chalkboard background in the 'School' theme, I was able to make the entire canvas a faux chalkboard. Then I added an overlay at the top and made it transparent before adding my "Menu" text.
Then it was time to start adding my menu items. I used all the different chalkboard-like fonts available on PicMonkey. Some of them are part of the standard free package, and a few like Sketch Block and Stroke Dimension I could only gain access to because I had the free trial of PicMonkey's Royale (indicated by the little crown).
Alright alright, I'll do a Christmas home tour. You twisted my arm. Not really...but I have been dragging my feet about putting a together a post wrapping up all my DIY Christmas decorations. Since I hosted a little Christmas dinner party the other night, I thought combining the two would be a great way to take you on a little home tour - while also sharing some Christmas party ideas.
Let me start off by saying I love to decorate and plan parties and the Christmas season is my favorite, so you know I was totally in my element. I'm sure I seem like a total over-the-top hostess, but I actually enjoy all the little details that go into make it something special and something to remember. This year we kept it simple and small and only had three other couples (minus our combined 9.5 kids) for the dinner party. Technically, I guess the.5 was there....
I'm not really a 'one for you, one for me' kinda girl when it comes to Christmas shopping. I rarely self-indulge, but there was one thing I just couldn't pass up this holiday season. As I was walking rushing through Kohl's I spotted this beautiful white faux fur Jennifer Lopez throw. It was marked down from $59.99 to $17.99 and with a coupon I was more than sold...I was in love.
When I got home, my kids instantly fell in love, too. My five year old begged me to let her sleep with the most cozy blanket in the house. Note the other blanket right behind her...
Sorry, mommy's gonna be selfish for a hot minute, and say NO! When the kids are finally tucked in bed, the lunches are packed, the dishes are done and the fire place is roaring...I curl up under my new throw and go to my happy place. See...I even had to do a happy place selfie so no one would get too close and steal my blanket.
Did you buy yourself anything this holiday season? Please share in the comments below!
Thanks for stopping by 2IY! If you like what you see, we'd love for you to pin it!
Sure, so Mother Nature gives us a 70 degree day smack dab in the middle of December - along the Mid-Atlantic- and makes it RAIN? What is up with that? That's like the worst tease ever. Wah Wah Wah...and so we were stuck in side...again. And guess what this mom had up her sleeve...another kids hand print project! I have a whole board of handprint art ideas on Pinterest..and I have to say they are very popular! The one we made today is different than anything we've made before because it's actually a 3D ornament, instead of just a paint hand print.
The are a few different salt dough recipes for ornaments floating around out there, but I did this one <<<. To make one Santa handprint ornament and eight other small to medium size ornaments I went with 1 cup of flour and half a cup each of salt and water.
This is a toddler-friendly craft and since I had a pint size helper, he helped me mix the flour and salt together in a bowl.
Hi you party animals! We're back this week to party, but due to the holiday this week, we're extending last week's link party for another week. We'll be back next Sunday, Dec 29 with a whole bunch of features! If you've already linked up, feel free to add a few new projects to the party and if you're new to the party - WELCOME!
Here's a quick look at what we were up to around Two It Yourself last week...
Now let's get to the party. The more the merrier so go ahead, show us what you've been up to by sharing a link or two or three to your best blog posts (please link to posts and not your blog's homepage)! Click here to link up now.
Looking for a fun little project while your kids are off for Christmas? You've come to the right spot! Last week mine had two snow days coming off a weekend and by Monday 8 am we were all going majorly stir crazy. So I broke out the finger paint and let them have at it...yup jammies and all!
I don't do many reviews here on Two It Yourself, but I thought I would share one with you today as we quickly approach the holiday. I don't know about you, but we've been enjoying the first days of holiday vacation at home playing with what will soon be the 'old' toys and watching some fun movies -- many of them thanks to our Amazon Prime subscription.
A few weeks before Thanksgiving my husband suggested we finally shell out the $79 and get Amazon Prime. If you're not familiar with the Amazon.com program you get 2 day free shipping on any item that's part of Prime. It's certainly not everything on Amazon because many items are sold through a third party, but it is a lot. What I didn't realize, but my husband was quick to point out, is the Prime membership also gets you unlimited access to a database full of nearly 15,000 tv shows and movies, as well.
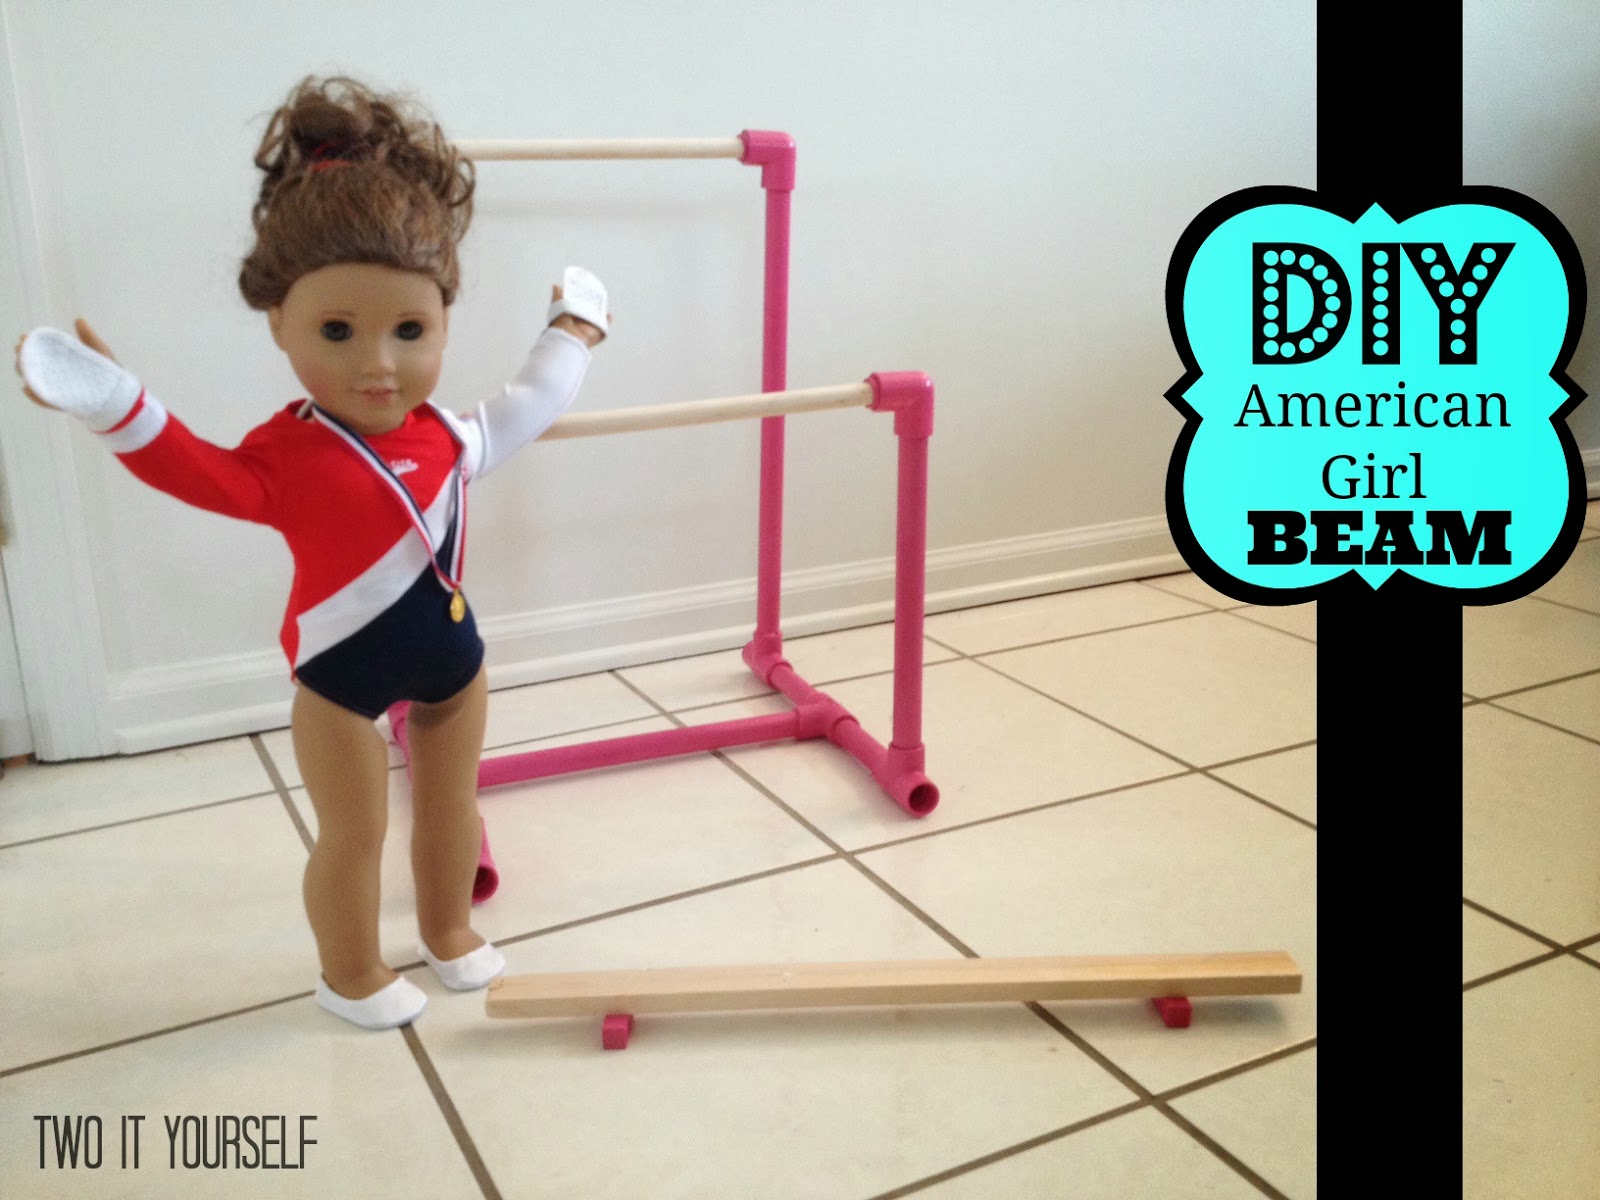
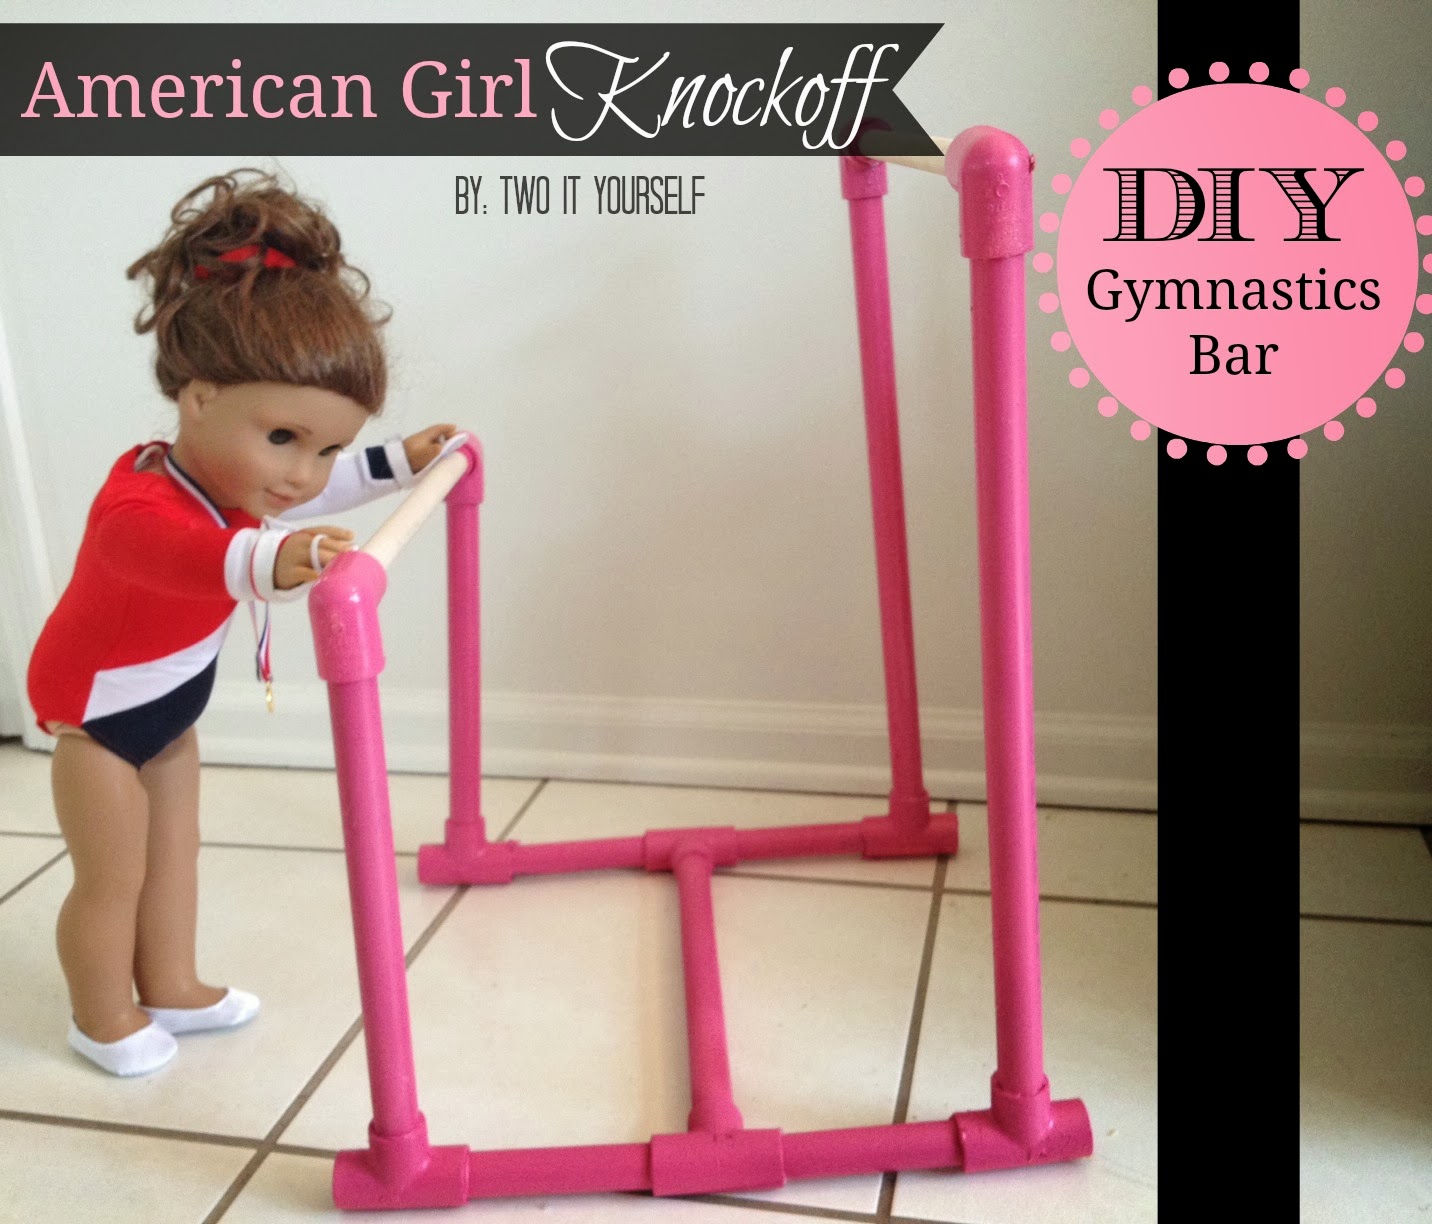
A few days ago I shared my version of a DIY American Girl Gymnastics Bars. Now, I'm back with the balance beam to complete the gymnastics set - and it's even easier! All you need are two square dowels (I found them at the craft store) and wood glue. Spray paint is optional - I had it on hand and I figured I'd match the bar and beam, so I used it on the supports.
Looking to buy a unique gift for someone on your shopping list or do you need a DIY gift idea that you can make yourself? Well, you've come to the right spot. Two It Yourself's 2013 Unique Gift Giving Guide is full of both so let's just cut to the chase since Christmas is now just ONE week away.
So what to do when one of the only gift your 5 year old American Girl Doll-loving girl keeps telling Santa is a $200+ gymnastics set? Nevermind the fact that I could send my real live living breathing daughter to actual real live gymnastic lessons for that amount...but now she wants her doll to have a set of uneven bars and a beam, too. Are you kidding me?
There was no way I was going to spend that amount of money on something for a doll. Sorry. Not gonna happen. But, there was also no way I wanted my precious baby girl to be disappointed on Christmas morning and so I set out to make a DIY American Girl gymnastics set.
Ever wonder how bloggers like yours truly easily edit photos (and design graphics like the one to the left) with all those overlays (ie the adorable elf hat) and fun fonts (hello, marquee!)? There's actually a lot of thought that goes into the editing of a photo and it starts with snapping the picture: Is there logical, clear and unobtrusive spot on the photo for an overlay or banner? Is the photo's orientation blog friendly? Is the edited picture Pinterest-friendly? Is the font color and size easily legible? Will text be cut off if only a square thumbnail of the photo is displayed?
Many people don't have Photoshop - perhaps the most well-known photo editing software. While there are many free online services to edit photos PicMonkey is a favorite of many bloggers - including this girl right here. Why? There are many reasons, but #1 and 2 in my book are ease of use and a huge selection of graphics, fonts, options, and overlays.
I have no affiliation with PicMonkey, I just like to use it and do so on a daily basis. Here a few ways I've used PicMonkey recently on the blog and even on my family's Christmas card....
I don't know about you, but if it wasn't for the funny stuff my kids say and do I'd pretty much pull my hair out six days of the week. Somehow just one of their unintended, hilarious one-liners can turn a bad day good any day of the week. I used to write them all down in a MS Word document...and then I had my second kid. Yeah, I haven't even written the poor guy's birthday in his baby book yet. He's 2.5...years not months. But what I do, nearly daily, is share the funny stuff my kids say on Facebook. Turns out FB is actually a perfect way to keep all the quotes in one place.
This year, I decided I would go back through my year's worth of Facebook status updates as a way to remember all the funny stuff my kids said and turn it into a little book. It's the perfect last minute gift idea for daddy...or if you're a dad, mommy...or grammy or pops or whoever! I can just see my husband now flipping through it while sitting at his office....those little nuggets of kid wisdom melting the frustrations and stress of work away.
Well...we've done it again! For the second time in less than a month, Two It Yourself is co-hosting the totally awesome, unbelievably huge PINcentive Blog Hop. I could not be more excited to have my Thrift Store Lamp and Shade Makeover featured this week and now we're joining the team as a guest.
Alright so let's get down to business, because these girls at the PINcentive Blog Hop mean business...I'll let Elena from Cropped Stories take it from here....
Welcome to the 15th week of the blog hop! I think a big THANK YOU is in order to everyone who has been linking up. More so for making it EXTREMELY difficult for our co-hosts to choose winners each week and providing us with such great recipes, crafts, tips, parenting advice, tutorials, (you name it)! Your content has truly been a pleasure to read and it keeps getting better each week!
If this is your first time linking up; WELCOME! I am extremely excited to provide this link up for you today and the opportunity for you to increase your traffic, followers, and improve your page rank!
I think I like wine accessories more than I actually like wine. Take for example, Pottery Barn's textured linen wine bags = LOVE! I loved them so much I knocked them off....cause, you know, I love Pottery Barn...oh and they're no longer available so I basically had no choice, but to DIY.
The PB version (on the right above) has a linen look so I used my go-to linen impersonator: drop cloth.
Oh, December, where are you going? Has this month just been flying by or what? As always, we're thrilled to have you stopping by to party with us 'cause we know just how busy you are and how precious your time is. So from me and my co-hosts Amy from Delineate Your Dwelling and Allison from Dream A Little Bigger a great big THANK YOU!
Each week the party is growing and the talent is unbelievable making it difficult for each of us to pick our own four features.
Here's a quick look at what we were up to around Two It Yourself last week...clearly, we're getting in the Christmas spirit.
I get more questions about how to print on burlap than pretty much anything else on 2IY and so I figured instead of always directing people back to one paragraph in a post on my Stars and Stripes Banner, I would finally just lay it all out there - plain and simple.
Are you ready to have your life changed? I promise you when you start printing on burlap you will NEVER go back to stenciling, painting, or your cut machine for simple little projects like monograms. Of course, you can also use the print on burlap technique for more complex projects too...
Clearly I like to create and decorate, but I'm not a big DIY Christmas Ornament maker. Today, however, that changed. I had about 10 spare minutes....I kid you not, that actually happened. Somehow between two kids, two snowdays, a minor medical procedure, the craziness of Christmas, and filling countless Etsy orders I actually had a few minutes to create.
Anyway, when you have 10 free minutes, a scrap of burlap, and a small wood embroidery hoop, what do you do? You make your own ornament, of course. At least that's what I did...and it was so easy which makes it that much more exciting.
First I designed the ornament in PicMonkey. Don't be intimated by "design" because by that I mean I opened up the free photo editing software, I clicked "Design" and picked 4 x 6. I took it up to 100% view picked a wreathery design I liked and added a V. That part took me about 2 minutes.
So...I did it. I jumped in front of the camera as much as I'd rather be on the other side (I spent 5+ years behind it as a TV news producer before calling it quits to raise my kiddos) just so I could participate in a really cool opportunity with Hometalk.
The home and garden website invited me and three other bloggers - Shelly from Sow and Dippity, Jocie from The Better Half/One Project Closer, and Marie from Fort Ledbetter - to share and demonstrate our DIY mini Christmas trees. Wow! What amazing talent these ladies have...I was just honored to be sitting amongst them...in my living room.
We each joined Miriam, our Hometalk host, for the live half hour chat and demo. I shared how to make my mini tomato planter Christmas tree which I made for about $2. In case you missed the live stream - or if you just want to watch it again (mom!) - here's the full video. I encourage you to watch the full hangout because all of the trees are totally awesome (and so different), but if you just wanna see my mug I start my demo at about 13 minutes in.
Thanks for stopping by 2IY! If you like what you see, we'd love for you to pin it!
I don't know about you, but I have noticed that with every year that goes by we get fewer and fewer Christmas cards. I'm sure part of it is friends figure you keep up with photos and happenings on Facebook and the other part of it is expense. Between the cost of Christmas photo cards and the postage to mail them, it's not cheap to send out dozens and dozens of photo cards.
Every year my list seems to grow, but this year I'll be trying to keep it to under 75 cards. For that many photo cards, it can easily cost over $50 and that's not even including postage. This year I decided I would make my own cheap photo cards. With all the online editing programs out there, it's actually really easy to do.
A friend of mine asked me to make her a burlap banner reading 'Merry Christmas' that she could hang on her mantle. There are tons of variations on the Christmas bunting, but she wanted her pretty simple: just a red letter per flag with a Christmas tree separating the two words.
She also requested that all of the flags be in one straight line, not two tiered like many Merry Christmas banners are. But as it turns out making the single row of flags required the rope to be 75 inches long - way too long for the mantle. Obviously, we reverted to plan B and went with two banners.
I turned to my trusty Powerpoint to design the flags. I always start with a simple triangle outline and copy and pasted it repeatedly, to ensure that all of my flags are the same size. Then I just changed the letters and moved them around slightly to center them in the flags. For this project I put two flags per slideshow. They are still a good size - about 6" x 6.5".
I grabbed a Christmas tree icon from my favorite PicMonkey and used it to design a flag the same way I did with the letters.
Finally, I can share my log tea light holder center piece for my Christmas dining room table with you. The project is actually pretty straight forward and fast, but for some reason it took me months to figure out how and where I wanted to use it. But now she's ready for her 2IY debut just in time for Christmas.
I had been wanting to make a log tea light holder ever since this huge branch fell off a tree in our backyard. Instead of making it then, I made a set of tree branch candle sticks. I was waiting for another branch to fall but unfortunately (or, I guess, fortunately) one never did. So I did the next best thing...I raided the wood pile.
Well, hi there! As always, we're thrilled to have you partying with us at the Link It or Lump It Party! My co-hosts Amy from Delineate Your Dwelling and Allison from Dream A Little Bigger are certainly happy you're joining us for another awesome party. Each week the party is growing and the talent is unbelievable making it difficult for each of us to pick our own four features.
Here's a quick look at what we were up to around Two It Yourself last week...clearly, we're getting in the Christmas spirit.
A few years back I had this great idea to buy a gingerbread house mold to make it 'easier' to make gingerbread houses with the kids each year. It was after the holiday and the Wilton Gingerbread Mold Pan
was on super clearance at the craft store. I should have known there was a reason it was still available. There's no way any person in their right mind - who wants to stay in their right mind - would attempt to make a gingerbread house from scratch alongside a toddler and a five year old.
My husband looked at me like I was crazy when I brought the kit home. Not that that's too out of the ordinary, but this time I did think he had a point. I promptly returned it - but with the mindset that my kids would not go through their childhood deprived of making Christmas-time gingerbread houses.
Then last year my aunt told me her little secret - use milk cartons (and Halloween candy) to make easy, kid-friendly, and inexpensive gingerbread houses. How freaking genius is that?
My 2 year old and I set out to get all our supplies: 2 pint-size milk cartons, some kid-friendly candy (none of those tiny rock hard bead-like candies that come with the gingerbread kits), what remained of our Halloween candy stash, a container of pre-made icing, and a box of graham crackers.
I shared this lamp and lamp shade makeover project a few months ago as a guest post on Craft Dictator, and now thought I'd share it with all of you, as well.
I can never wrap my head around just how expensive lamps are - especially glass lamps. I love the look, but not the price.
Lucky for me I spotted this ol' girl at the thrift store for $9.99 and I immediately snagged her before anyone else could. This was one of those pieces that I kinda stood there and thought: "How could someone actually throw that away?" I mean...oh, the potential!
She looks like something similar I've seen at Pottery Barn for
10 times the cost. Okay, well maybe with all the dust and brass she
doesn't, but that's nothing a little glass cleaner and spray paint can't
fix.
As soon as I got home I started working on giving a new life to this light.
I am thrilled to announce that Hometalk, the largest home and garden site on the web, has asked yours truly to 'hang out' in a live stream panel discussion and tutorial on DIY Christmas trees - and YOU'RE invited! Woohoo!
During the live hangout on Hometalk's Goggle+, I will be demonstrating how to make my mini tomato planter potted Christmas tree. It's currently adorning my front porch...along with tons of other (cheap) DIY Christmas projects.
What most of you probably don't know is that long before my blogging days, I was a TV news producer. There's a darn good reason why I wasn't in front of the camera and that is I hate seeing and hearing myself on camera, but because I love you all so much, and it's like a totally awesome way to get Two It Yourself's name out there, I'm getting in front of the camera.
I'll be live chatting from my living room, along with three other bloggers. We'll all be part of a 45 minute live demonstration sharing our amazing mini Christmas Tree ideas.
The hangout starts at 2pm EST on Tuesday, December 10 and guess what...you're like soooo invited! You do NOT have to be a Hometalk or Google+ member to watch live, but we would like to know who's planning to come so please RSVP.
This will not only give you a friendly reminder to tune in, it will also let me know how nervous I should be because if there are only like 5 people - including my mom and my hubby - I won't be too nervous, but if I know you're all watching I might be super excited and also totally sweatin' it. But that's cool - just RSVP and come hang out next week! I promise, you won't be disappointed.
If you just can't make it IE your boss isn't buying that head cold that you suddenly came down with - it's cool...the full demonstration will be up on YouTube following the hangout and of course I'll be sharing it like a mad woman on the blog, Facebook, Twitter, and wherever else I might stalk you. I kid, I kid...but you won't miss it, don't worry!
So, what do you say? Will you come hang out with me, Hometalk, and a few other totally cool blogger friends? Click here to RSVP now.
Thanks for stopping by 2IY! If you like what you see, we'd love for you to pin it!
I may be slightly obsessed with burlap for the momentmonth season year....but I promise you there is a good reason why. Burlap, while it can be a real mess to work with, is one of the most versatile mediums (did I really just write 'mediums'?? Just trying to up my game from my usual 'things') I use to create. I have made everything from toilet paper napkin rings to wreaths and pillows with burlap.
Since I love it so much I thought I would share my love of all things burlap today with a great big roundup of some really cool DIY burlap crafts and projects we've featured right here on 2IY...so here goes. You can click each photo to be taken directly to the tutorial.
Is there a little elf floating around your home these days? Are you kids jumping out of bed every morning in search of where that mischievous elf is hiding or to see what trouble he's gotten into overnight? Are you left scratching your brain come 10 pm wondering what WWED...or worse running down the steps as fast as you can at the crack of down before the kids get out of bed so you can move the elf because you forgot to do it the night before? Fear not, my elf-manipulator friends...
If you're looking for easy, fast, and non-messy Elf on the Shelf ideas, you've come to the right spot. Everyday I plan to share some elf-spiration, right here, so you won't be left wondering what kind of trouble your elf will get into.


.jpg)


.JPG)


.JPG)


.jpg)


.jpg)

(1).jpg)
.jpg)


(1).jpg)


.jpg)


