In case you missed anything here's a quick recap of 12 DIY Projects we shared in April...
Wednesday, April 30, 2014
12 DIY Projects to Inspire (April Wrap Up)
Monday, April 28, 2014
Washi Tape Storage
So a few weeks back I majorly scored on Pick Your Plum...I got 10 rolls of Washi Tape for something like $13. Totally cleaned up, right?! Of course, now I have a Washi Tape storage problem. That's a fine problem to have, if you ask me.
Sunday, April 27, 2014
Link It or Lump It Link Party #35 {Plus Features}
Welcome to the 35th Link It or Lump It Link Party! I missed you all during our brief holiday break...but I'm glad you're back now with some craftiness and goodness to share!
Before we get to our features...here's a look at what we've been up to at Two It Yourself recently...
Along with my fafabulous weekly co-hosts, Amy, Sonnet and Alison, we also have a special guest co-host this week. Sarah from Creative Ramblings is with us.
"I’m Sarah. I’m a Wife, Mom, Business Owner, Blogger, DIY Enthusiast, and Thrifty Crafter. I have a passion for creating and share my journey at Creative Ramblings. I also make and sell paper creations on Etsy at Original Greetings by Sarah. I am blessed to be able to spend my days with my 2 young girls who like to get crafty with me."
Be sure to follow Sarah on your favorite social media sites...(and check back next week for her favorite link party pick).
Alright, let's get right to the features...
Thursday, April 24, 2014
2IY is 1! Our {First Year's} Most Popular DIY projects, Crafts, and Tutorials are...
We're celebrating our first bloggy birthday with a look back at our top five most popular DIY, craft, and projects in our first year!
| |
Labels:
DIY,
DIY Furniture,
How to Blog Series,
Wrap Ups
Tuesday, April 22, 2014
How to Blog Series: Making a (Free) Blog Header
This week marks Two It Yourself's First Blog-iversary. We're celebrating a year in the blogisphere with a "How to Blog Series." Today's topic is on how to make a free blog header.
Every blogger knows looks matter...I may be in my pajamas and makeup-less at the keyboard, but my blog's gotta look good. :) Since the blog header is the first thing people see when they come to your blog, you want to make a good first impression and that means having an eye catching blog header.
Two It Yourself has gone through a series of blog headers, but in recent months we've finally found one that works, for us, for several reasons.
1) It immediately gives off the look, feel, and vibe of our blog. It sets the tone that we use throughout the blog.2) The header takes up the full width of the screen without forcing a scroll bar along the bottom.3) The header is short enough that the ad above the first blog post is 'above the fold'4) The background is transparent.
Let's make one thing clear: I am in no way a blog graphics design expert. For all I know my blog header could make blog and graphics designers cringe, shriek, and go blind all at the same time. All I'm here to do is to share with you what I have found works on my blog.
Labels:
Blog Tips,
How To,
How to Blog Series,
Tips and Tricks
Monday, April 21, 2014
DIY Coasters with Mod Podge and Napkins {And a Giveaway}
This post is part of a social shopper marketing insight campaign with Pollinate Media Group® and All You Magazine, but all my opinions are my own. #pmedia #lifeforless http://my-disclosur.es/OBsstV.
Can you ever have too many coasters? They make great, inexpensive gifts and even if you keep them for yourself they're a great way to add a little color and personality to a room - while being totally functional. During a recent trick to Dollar General I picked up the April issue of All You Magazine (totally scored using this $1 off coupon - get it while supplies last).
Sunday, April 20, 2014
Link It or Lump It Link Party #34 {Party On}
Happy Easter! The 34th Link It or Lump It link party is continuing for another week due to the holiday.
We'd love for you to link up a few more projects this week. Next Sunday my co-hosts and I will be sharing double the features on all of our blogs!
Tuesday, April 15, 2014
3 (Easy) Easter Treats for Kids
The countdown to Easter is on! If you're looking for some last minute Easter treats to make with the kids - you've come to the right spot.
I always like to cook with the kids when I can and they are always threw the roof when I ask them. The rice crispy treat robin's nests and Easter cut outs are are super easy to make and the best part is they're a 2 for 1 deal: make one recipes get two desserts!
I started by following the directions on the back of the bag of marshmallows to make traditional rice crispy treats.
I had the kids pouring in the marshmallows, stirring them up between meltings in the microwave, and then pouring in the rice crispies. I poured the sticky mess onto a medium size cookie tray so they would be a little thinner and easier to work with. Then I set them in the fridge to cool for about 30 minutes.
When it was time to cut the RCT cut outs, the kids took turns using an Easter egg shaped cookie cutters and two bunnies (my daughter came to call them bunny head and running bunny).
Labels:
Cooking and Baking,
DIY Kids Stuff,
Easter,
Spring Decor
Monday, April 14, 2014
Patio Tour and Plans for a Mini Makeover
So I'm like super excited. This weekend - after what seemed like the eternal winter - we finally were able to get out the patio furniture. I know! I know! The back patio is pretty much the reason we bought this house exactly three years ago. It totally expands our living space from the spring through the fall and I am uber excited that the snow has finally melted and we got...wait for it...a 79 degree day on.a.weekend!
Here's a little patio tour of the bare space. See why we love it?
Labels:
Curb Appeal,
DIY,
Home Tour,
Outdoor Living,
Spring Decor
Sunday, April 13, 2014
Link It or Lump It Link Party #34 (Plus Features)
Welcome to the 34th Link It or Lump It Link Party! All of your Easter ideas are off the charts. There are so many awesome ideas and crafts out there that I'm honestly feeling a little overwhelmed at how many I want to do. The 'to do' list just keeps on growing.
Here's a look at what we've been up to at Two It Yourself recently...
Along with my fafabulous weekly co-hosts, Amy, Sonnet and Alison, we also have a special guest co-host this week. Nicole from Uniquely Women is with us.
"I'm a born and raised Midwest girl with a passion for DIY projects, antiques, and a good thrift store find. "Uniquely Women" is my outlet to provide readers with my creative adventures along the way! I share my travel adventures, DIY tutorials, home decorating ideas, and more! Come on over and join in on the fun!"
Be sure to follow Nicole on your favorite social media sites...(and check back next week for her favorite link party pick).
Pinterest: http://www.pinterest.com/uniquelywomen/
Instagram: http://instagram.com/uniquelywomen
Bloglovin': http://www.bloglovin.com/blog/11852727
Alright, let's get right to the features...
Thursday, April 10, 2014
Laundry Room Update...This is NOT Going Well
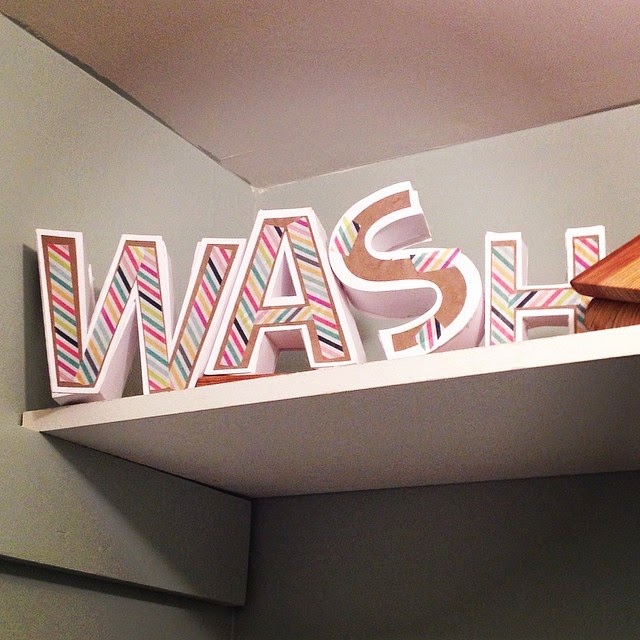
I cursed myself! Yesterday, on Instagram I shared this picture of the final touch in my newly made over laundry room. The caption: "that's a wrap." Yeah, well guess what..the washer had other plans.
It honestly wasn't an hour later that I noticed a pool of water in the pan under the washer. Are you kidding me? This is not normal. Water is not supposed to be in the pan. Don't get me wrong, it's better than it being all over the floor, but it's not supposed to be in the pan. Something is leaking. Something had me sitting on the floor next to the washer with a turkey baster and a bowl for a good half hour sucking out water drop by drop. (Not even joking...don't laugh!) Something is holding up my big reveal!
So today, instead of taking some gorgeous pictures of a newly made over laundry room (that I'm sure will never be nearly as neat as the moment it was snapped on film) to share on the blog, I will be dealing with finding an appliance repair man to come in and tear apart my laundry closet and figure out what is wrong with my washer.
The washer is old. I don't know how old, but it's likely not worth putting too much money into. We will see what he says...but I'm pretty sure any repairs or replacements are going to push me over my $100 laundry closet makeover budget. A new washer was not in the plan or the budget.
The good news is at least I have about $50 to play with since the laundry room makeover, to this point, with a new light, new cabinet, shelving, decor, paint, and a wall mounted drying rack, didn't cost me much at all.
Thanks for stopping by 2IY! If you like what you see, we'd love for you to pin it!
Wednesday, April 9, 2014
How to Make a Peeps Topiary for Easter
I'm not a huge fan of eating Peeps, but decorating with them...why, yes, I will do that! I love how this little peeps topiary came out and it wasn't too difficult aside from a few minor top-heavy issues.
So what you'll need...four boxes of chick peeps, spray paint, a basket or pot for the base, a stick or dowel no less than .75" in diameter, a cross stitch hoop, floral foam and Easter grass.
Start by spray painting your dowel or stick. You pick the color, I went with green because I had it on hand. Put the floral foam into the basket or pot. It's a good idea to add some newspaper to the sides if it's not snug against the side.
Now, the original project, in Women's Day Magazine, suggest hot gluing the dow to the hoop right at the screw first and then hot gluing the peeps (keep them in attached sections of five). Well, I got news for you people, I'm impatient. I didn't want to wait for the stick to dry so I glued the peeps to the hoop, as it laid flat, before I attached the dowel (you will need a lot of hot glue!).
Monday, April 7, 2014
DIY Hopping Bunny Burlap Easter Banner
Two of my favorite things...burlap and bunting. When I combine the two - as I do pretty much every season - there's no limit to the possibilities. Of course, there are tons of Easter banner ideas out there, but I thought it might be cute to make a banner where it looked like a bunny was hopping across.
Labels:
Beach Decor,
Burlap,
DIY Holiday Decorations,
Easter,
No Sew,
Spring Decor
Sunday, April 6, 2014
Thursday, April 3, 2014
Turn a Thrifted Cabinet into Laundry Room Storage (And Tips for Hanging a Cabinet)
After being stalled for a few weeks, my laundry room makeover is finally nearing completion. The biggest project - and what had me at a standstill - was the cabinet. I purchased the old kitchen cabinet at a thrift store for just $15 several weeks ago.
I cleaned it up and peeled off as much of the nasty shelving paper as possible.
Tuesday, April 1, 2014
12 DIY Projects for Busy Moms! (March Wrap Up)
It's time for a look back at some of what we did around here in March! Looking back I realized that so many of the DIY projects we shared, last month, were completed in less than an hour. As a busy mom of two - a 5 year old and a 2 year old - I am often squeezing projects in during nap time. DIY projects and crafts have to be pretty fast for me or else they are left half finished.
Here are 11 busy mom-approved DIY ideas. Just click the title above each photo to go to the tutorial.
Labels:
DIY,
Home Decor,
Laundry Room,
Month in Review,
Spring Decor,
Wrap Ups
Subscribe to:
Posts (Atom)