Thursday, October 31, 2013

Pinecone Decor: How to clean and dry pine cones for crafts

Awhile back I shared how to clean and dry acorns so they can be used - bug-free - for crafting and decorating.  If the acorn is nature's symbol for fall, then pine cones are winter's.  So, now it's time to talk about pinecone decor and how to clean and dry them so you can use them in all of your late fall and winter decor including pine cone wreaths, table-scapes, garland, etc.

The process to dry pinecones is very similar to acorns in that you want to bake them to kill off any bugs that might be making a home in your next craft project.  Unlike acorns, however, you do not want to wash them before you dry them in the oven.   Pine cones close up when they are wet and are open when they are dry...and you definitely want the scales as open as possible when using them for crafting and decorating.

Wednesday, October 30, 2013

Best {Small} Closet System to Maximize Organization and Space


If you get the 2IY Weekly Best Newsletter you've been getting sneak peeks on the major renovations in our master bedroom.  We are expanding our master bath to make it large enough for a double vanity.  But to do that we had to take about half of my ungodly small 5' reach-and-grab closet - seen on the right below.   The closet project was sort of an after thought for me - something that just had to be done because, let's be honest, ain't no girl around that's gonna make it with 2 feet of closet space.

Tuesday, October 29, 2013

Fall Home Tour: 10 DIY Fall Decorating Ideas {for busy moms}


If you've been following along for awhile you know I've been decorating for fall since what feels like  the first of September August.  This year I made a lot of DIY fall decor so I thought I'd do a great big roundup and take you, my lovely readers, on a fall home tour.   Like a lot of you, I am a busy mom to two little ones, so I know DIY decorating ideas must be fast, easy and cheap.

You're welcome, in advance :)

Monday, October 28, 2013

Thrifted Dresser to TV Stand/Buffet/Entryway Table

Not gonna lie...I have been dying to share my latest furniture flip with you.   I typically like to keep my projects in the works as a big surprise, but this one I couldn't keep to myself.  If you following 2IY on Instagram, you know just how long I've been working on turning this thrifted dresser into a tv stand...or is it a buffet or is it an entryway table?  The great thing about this piece is it's sooooo versatile it can be used in almost any room in the house.  My house. 

I am just gonna say up front I love this piece.  I love the finish.  I love the color.  I love the uniqueness.   I love that it's functional and stylish at the same time.  I love it.  I love it so much that even though I bought it to flip and sell I just simply can't let it go.  So it's found a new home in my sunroom.

I bought this solid wood dresser at my favorite thrift store nearly a month ago.  When I grabbed the tag to claim it I didn't even realize that the $45 price table included a huge solid mirror in nearly perfect condition, too! I mean really? They sell mirrors just like that at PB for $299. 

Sunday, October 27, 2013

Features and Link It or Lump It Link Party #11

Happy Sunday, all...all of you who made last week the biggest and best Link It or Lump It Link Party yet!  I am so excited to have joined the party as Allison from Dream A Little Bigger's weekly co-host.  That means you link up once, but you get your links on two blogs..and that's twice the chance of being featured since we each pick our favorites.

This week there were so many great link ups it was honestly hard to pick just three features!  It's a tough job, but somebody's gotta do it....so here goes.  Oh, we're also starting something new- we've created the 2IY Link It Love it Pinterest board where we pin our top 10 favorite link ups every week! So be sure to check that out, too.

First up - the most popular link up of the week was The Sum of Their Stories Infinity Loop Scarf.  So easy and such a great accessory! Great job, Julie.


Now for some features...because everyone likes a little special attention, right?

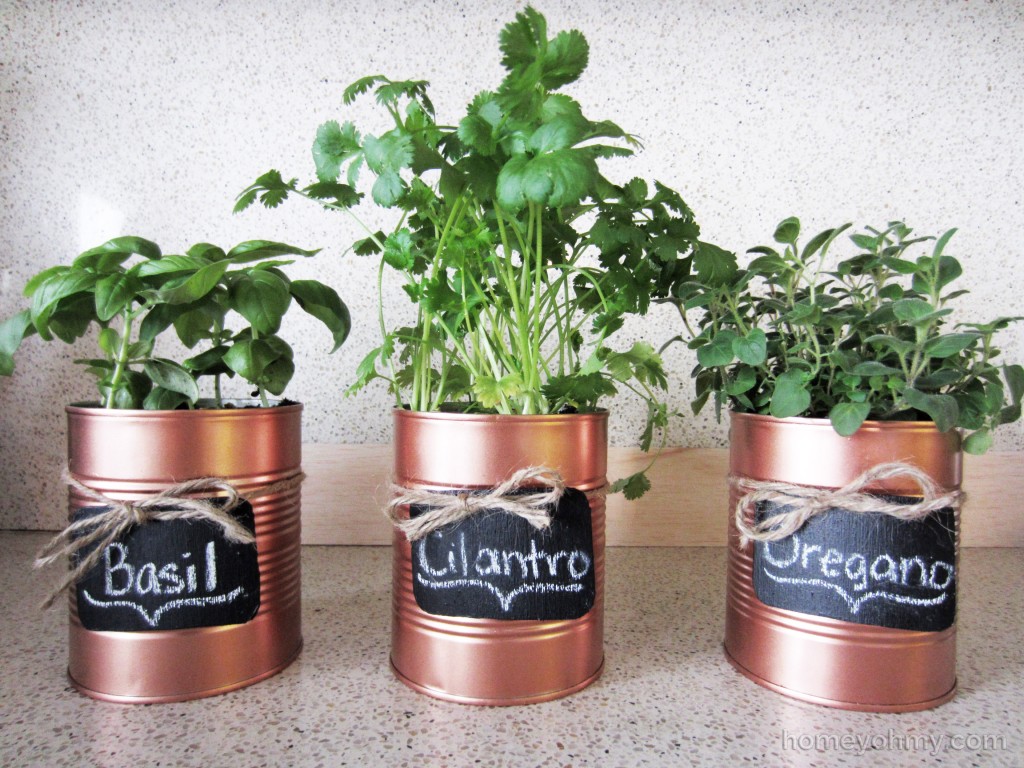
I was literally drooling over Homey Oh My's Copper Planters with Chalkboard Tags.  How freaking simple and genius! Just eat some stewed tomatoes, spray paint the can (is that not the best spraypaint color ever?) and add an adorable chalkboard tag.  Awesome job, Amy!

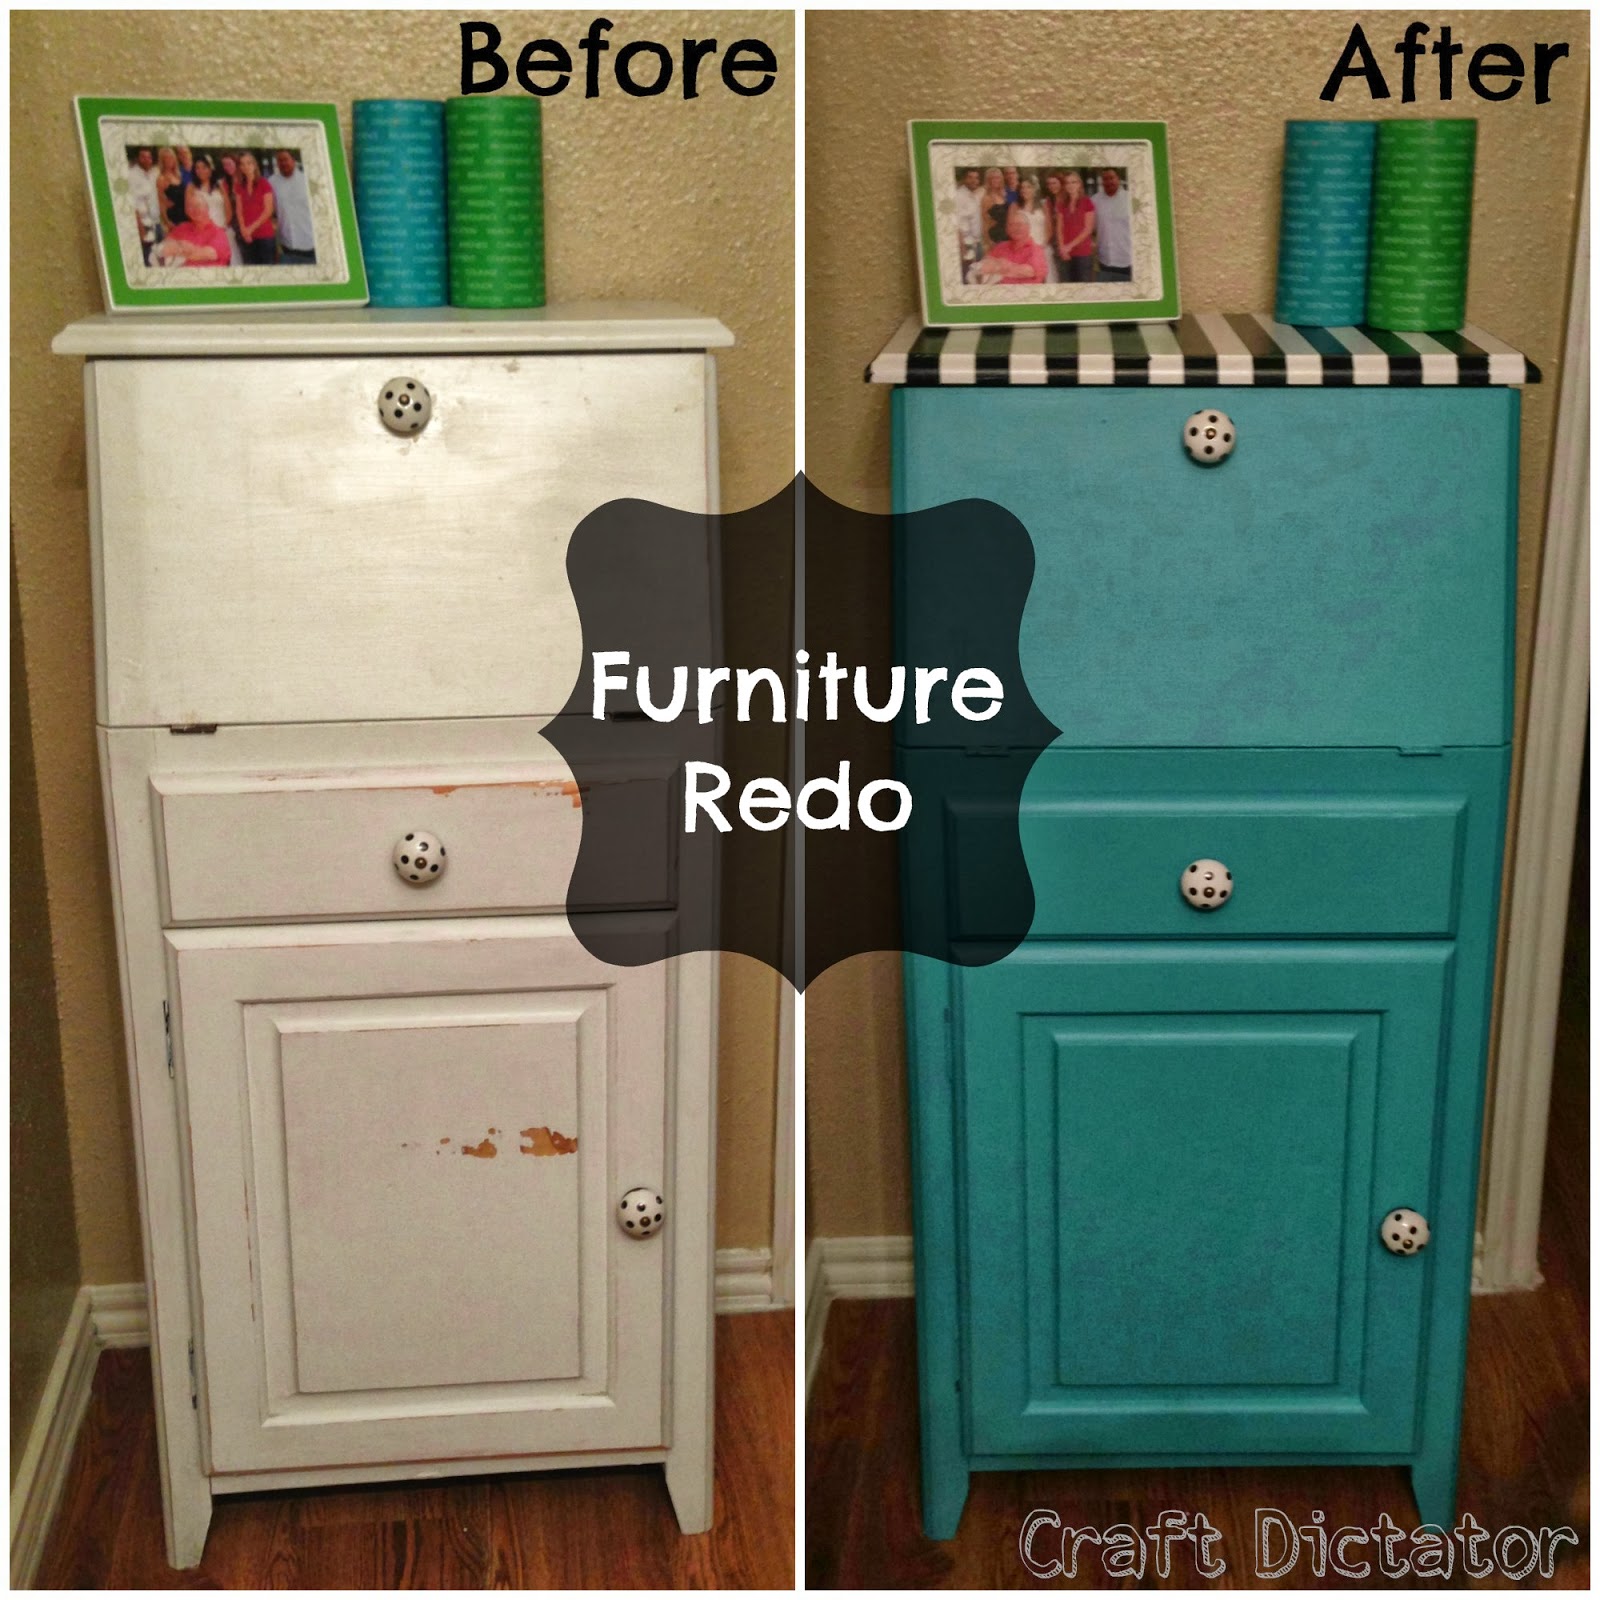
Nothing like taking something you like, and turning it into something you love.  That's exactly what Cara from Craft Dictator did with this Recipe Box Makeover.   We love it now, too!


...And last but not least I just adore the DIY Halloween Plates from Our Secondhand House.  What an easy and inexpensive Halloween decoration.  These would make great gifts, too!


If you were featured go ahead and brag a little - grab that "I was featured button" and show it off all proud! You deserve it! 
Two It Yourself

Not a feature this week on 2IY...go check out Dream a Little Bigger's picks and then...head on over to 2IY's Link It Love it Pinterest board where we are sharing our top 10 picks of the week! 

 Now let's get to the party. The more the merrier so go ahead, show us what you've been up to by sharing a link or two or three to your best blog posts (please link to posts and not your blog's homepage)! Click the "Read More" after the jump to link up.

Thursday, October 24, 2013

Yard Sale Nightstands Flip and ReSTOREd Challenge Update #2

Well, here we are more than half way through October and my ReSTOREd Seed Money Challenge is going strong. I'm currently working on my biggest piece of painted furniture yet. I'm hoping to get it up for sale by the end of this week - that is if I can part with it. It's a beauty, if I do say so.

So far I've sold four pieces - well, technically five you if count the set of matching nightstands as two.  These babies really plumped up my Seed Money Challenge Fund.

I found them on a local Facebook page where individuals sell stuff.  They came complete with yard sale stickers, because they clearly hadn't sold at $10 a piece.  The seller was still asking $20 for the set, but I haggled her down to $15 and she was happy to just get rid of them.

Wednesday, October 23, 2013

How to Make a {Real, Lighted} Pumpkin Topiary

I have been drooling over all the gorgeous pumpkin topiaries on Pinterest for the last month or so.  As I mentioned a few weeks ago, my front porch could definitely use some sprucing up.  After I scored five flower pots for $5 I decided I had a perfect excuse - not to mention a perfect base - for a pumpkin topiary.

I've been on the hunt for some large inexpensive fake pumpkins, but those babies don't come cheap in the peak of the season.  I plan to buy a few after Halloween when they're marked down on clearance, but this year I decided instead of going without I would go with a cheaper - real - version.  The problem with real pumpkins is they are heavy, they are not symmetrical, you can not drill into them (to use a dowel for support) or they'll rot within days.  Honestly, they're not ideal for a pumpkin topiary - but they are the cheapest way to go.  And with a few tweaks it is possible to make a real tiered pumpkin topiary, even one that's illuminated.

Tuesday, October 22, 2013

DIY House Number Sign (And how to drill into brick)

If you follow us on Instagram (you don't? GO DO IT NOW!)  you know I've been working on DIY house numbers.   We have one little house number on our mailbox, but if it's dark out people can't see it at all.  If I'm honest, even if it's daytime guests often miss us, because they're looking on the house for a number.   No more drive-bys...I've got you covered, my friends!

The actual house number sign only took me a few minutes to make, it was figuring out how to drill into brick to hang the plaque that delayed me more than a week.  It's not that it's that hard (well actually, it is hard...get it hehe) it's just you need the right tools to actually hang anything on brick and mortar.

More on that below, but first let's get to how I made this easy house number plaque.  I purchased the numbers at Home Depot for a few bucks each.  I could have just mounted them right one of the wood pillars we have out front or even directly onto the front door, but I wanted to jazz them up a little.

I found an old picture frame that was no longer being used for anything except collecting dust.  I took the frame apart because I literally only needed the frame - not the back, the mat, or the glass.  I made sure the house numbers would fit (they could have been placed vertically or horizontally, but I went with vertically) and then I spray painted the silver frame black to match the outside of our house.

Monday, October 21, 2013

DIY American Girl Halloween Outfits: Witch Costume & Candy Corn Dress

Ever since my daughter got her American Girl Doll she's been begging for all the accessories.  I made Miss Rebecca a DIY doll bed and even some matching bedding, but with Halloween around the corner, my daughter has been asking for a few outfits.

For one, she wants them to have matching Halloween costumes.  Fortunately, my daughter wants to wear the witch costume my mom made me when I was her age - so put a big ol' check next to that  because I don't have to do anything but show up with some green face paint. Since I figured my mom did all the work on that one, I agreed to make her American Doll a matching witch costume.

Saturday, October 19, 2013

Link It Or Lump It Party #10


So we've got some big news!!! We've been bursting at the seams to tell you that from now on we'll be joining Allison over at Dream A Little Bigger as the co-host of the Link It or Lump It Link Party!

I mean can I tell you how excited I mean to host this party every week? The party starts every Sunday morning and we don't stop partying until Friday.

I'll be featuring my favorites every week and Allison will be doing the same...but we are each picking our own favorites to feature.  So you know what that means? It means you link up once, but your DIY ideas, crafts, recipes, and home projects are seen by readers of two blogs AND you have twice the chance of being featured!

So lets get down to business and start partying, why don't we!  The more the merrier so go ahead, show us what you've been up to by sharing a link or two or three to your best blog posts (please link to posts and not your blog's homepage)! Click the "Read More" after the jump to link up.

Thursday, October 17, 2013

$35 Kitchen Table Makeover

Well, hello, there gorgeous! If you follow us on Instagram (and you do, don't you?!) you've been seeing this table makeover.

Well now it's finally done.  Can we all just take a minute and admire her.  Can you believe some sandpaper, stain, and paint turned a thrifted table into that?!

Steph picked up this table for a mere $35.  It's a standard wooden table not in too bad of shape, but nothing too exciting either.  She didn't come with any chairs and she didn't come up much personality, either.

Wednesday, October 16, 2013

2 Minute Styrofoam Pumpkin Tea Lights

Mini pumpkin tea lights are always a popular and very cute fall centerpiece. I've made them several times for Halloween/Thanksgiving-time parties and always love how they turn out.  But the problem is you can really only use tea light pumpkins one time, because you know how pumpkins gets once you cut them open.

This year I decided I would make them again, but instead of using real mini pumpkins I would try it with fake ones.   After pulling a few styrofoam pumpkins off a store-bought wreath in order to customize it for a friend, I had a few extra fake pumpkins lying around. (Score!)

The first thing I did was pull off the stem.

Tuesday, October 15, 2013

'Antique' painted table using stain over paint


If this table looks familiar, there's a good reason why.  She's been on the blog before looking quite a bit different.  I originally painted this 1960's vintage table from my local thrift store blue with a white drawer.  She came out nice, but honestly I was never thrilled with her. 


Well now...I'm in LOVE! 

I went at her with Fiesta Red (which I made into DIY chalk paint) and on the re-paint I skipped the two tone going for solid red.  I liked her well enough after I was finished with the red, but she just didn't seem totally authentic...this is a vintage piece and I wanted her to look it.   She needed some personality.  Some depth. 

Monday, October 14, 2013

Chocolate Banana Paleo Ice Cream Recipe

It's not often that I share a recipe here on Two It Yourself and even more rare that it's a Paleo recipe, but this one I just couldn't keep to myself.   If you're wondering what the frickety frack is Paleo it's often referred to as the "caveman diet."  My husband and I have been Paleo for about 5 months and while it was a tough transition (I consider it more a lifestyle than a diet), I love it now despite no dairy, grains, processed foods/sugar, or peanut butter.

But what do you do when you're paleo and in desperate need of an ice cream fix? You know what they say about invention, right?  Necessity is the mother of invention and believe me this mother was in need of some ice cream like asap.  I tried to guilt my husband into getting me a carton of cheat ice cream (it didn't work) and we were all out of Coconut Bliss, but we did have some frozen bananas.  That would work...oh and believe me it did!  And so here is my Chocolate Banana Coconut Ice Cream:

Ingredients: 
Instructions: 
  1. Place all ingredients into a food processor. 
  2. Mix until the banana turns into mush and the ingredients form a well-blended frozen ball of goodness.   
  3. Enjoy!

Thanks for stopping by 2IY! If you like what you see, we'd love for you to pin it!


 photo 23de5266-91bc-4226-85c8-8c74cb4c20ee_zps1313e4f5.jpg


Saturday, October 12, 2013

Teal Furniture Makeover {Guest Post from Craft Dictator}

Happy Saturday, everyone! Today it truly is a happy Saturday at Two It Yourself.  We're so thrilled to welcome our first guest blogger, Cara from the Craft Dictator.  Let's give Cara a big warm 2IY welcome.  
*** 

Today I'm going to talk about a piece of furniture I recently redid!  I got this white piece of furniture from my mom a couple of years ago.  It has lived in a bathroom, a kitchen, and a living room.  Currently it is in my hallway.  It is a very versitile piece of furniture that is great for storage, but we never really painted it.  It was kind of painted white but it wasn't painted well.  Then I got polka dot knobs on it about a year ago but never repainted it!  For some reason last weekend I decided this was going to be the weekend this piece got painted! This is what it looked like before I started.

Friday, October 11, 2013

Where to get cheap 'custom' fall wreaths


Last week a friend of mine asked me to make her a fall wreath.  Here's her text to me...um yeah, quite frankly, I'm not going to let you pay $150 for a wreath!

Of course, I agreed to make the wreath - if nothing else to stop her from spending way too much money on something that is an easy DIY.

She sent me pictures of a few wreaths she liked so I had an idea of what she was looking for.  She wanted something bold with lots of color; she likes berries and pinecones but not too many pumpkins; and she wanted the "stuff" to go all the way around the wreath not like my mini burlap banner wreath which exposes a lot of the grapevine.

Thursday, October 10, 2013

{Yay we're} Co-hosting the Craft Frenzy Friday Link Party!

So...we had so much fun co-hosting a link party last week we decided to give it another go! This week we've partnered up with Craft Dictator and Obsessive and Creative to host the Craft Frenzy Friday Link Party. 

Of course, we're thrilled that these wonderfully creative ladies are   having us not only for the link party, but also this week I'm a special guest blogger on Craft Dictator! You must check out my post on a fabulous lamp makeover with a fabric covered shade.  I think it's pretty great...if you ask me and my modest self.

And now let's get down to business....aka the party!

{Pin it to Win it} Monogrammed Burlap Pillow Giveaway

WoooWooo...it's giveaway time, people!

We're giving away a free monogrammed burlap pillow cover personalized for one lucky 2IY reader.

All you have to do is Pin It to Win It!!! Plus, you can earn extra entries to win by completing a few more easy steps like signing up to get our totally awesome weekly newsletter or following us on Facebook.  And since we always love comment love, we'll give you a few points for that, too.

Just follow the giveaway contest below to get started and start earning entries!


Thanks for stopping by 2IY! If you like what you see, we'd love for you to pin it!


 photo 23de5266-91bc-4226-85c8-8c74cb4c20ee_zps1313e4f5.jpg


Vintage Table Makeover and ReSTOREd Update


So last week I made a sweep through my favorite furniture thrift store and took home two pieces. One was this little vintage table.  It immediately caught my eye as soon as I walked into the vintage room. The tag said 1960's vintage baby blue table. As I sanded her down it was obvious this table has not only been well loved, but also painted a few times.

Tuesday, October 8, 2013

DIY Monogrammed Burlap Pillows

I admit it my front porch is lame right now...I've got a pumpkin and a flag and a pink solo cup where my five year old is trying to grow a tree out of those little whirlygigs she peeled off the street.  I'm not even kidding.  That's the extent of the excitement on my front porch at the moment.

I'm on the hunt for a bench, but it's taking WAY longer than I'd like to find one at a thrift store.  I tried the headboard bench thing, but that was just a giant fail because you need like 5 hands to do it and I only have two and the Mr. wasn't home...

Anyway, I'm living vicariously through my friend whose front porch is looking more fall-like everyday so, of course, I was honored when she asked me to re-cover a set of pillows for her bench.

Monday, October 7, 2013

I Spy DIY: 7 Master Bedroom Ideas

Last week on the blog I showed off my newly refinished/repainted nightstand and got some great feedback from readers on it.  One of the biggest compliments was from a reader who asked if the headboard in the photo was purchased or made.  I'll give you one guess...

That got me looking at the photo, which at first glance doesn't look like much other than the nightstand.  But actually when I look closer I realize just how much blood, sweat and tears  love I have poured into our master bedroom since I started transforming it in the spring.   In just this one photo I spy FIVE DIY projects that I have featured on the blog...can you see them?

Okay, okay I'll give you a few hints (and all the links to the tutorials)...

Let's start with the nightstand because it's the most obvious.  It was painted two-tone to match the walls and trim and new hardware was added.

Sunday, October 6, 2013

Link it or Lump It Link Party Features

Wow, you guys certainly know how to make the new girl feel welcome! We had a great response this week with some really creative link ups and ideas!

As a guest co-host for the first time, I wasn't sure what to expect - so thanks for making it extra tough on me! :) There were so many great projects and recipes linked up this week it was hard to pick...

But here are my top three picks from this week...


Pallet Scrap Wood Planter box by The Pin Junkie.  What a great way to use scrapwood and create something so rustic.  It's perfect for fall.


Dorothy Sue and Millie B's Upcycled 1950's TV Cabinet is a stunner.  We think the paint color and distressing are spot on.  Great job, ladies!


And last but not least....the Potion Garland Banner from Made in a Day is just too cute and unique to pass up.    The different textures and designs on the paper - not to mention the 'potions' make this one of the most unique Halloween/Fall buntings we've seen.

Be sure to head over to Dream a Little Bigger where the wonderful Allison, who so graciously had us as co-host, shows off her top picks of the week.  We picked different favorites so if you didn't get featured her...you still have a shot!

Thanks for stopping by 2IY! If you like what you see, we'd love for you to pin it!


 photo 23de5266-91bc-4226-85c8-8c74cb4c20ee_zps1313e4f5.jpg


Friday, October 4, 2013

Junk Mail Burlap and Gold Pumpkins

What...these don't look like junk mail?  You mean to tell me you don't typically decorate with junk mail?   I don't either, but desperate times call for desperate measures, right? Okay, so I wasn't exactly "desperate," but I was in need of some cheap free pumpkin filler and the closest thing to me at the time was some junk mail.  I ripped it open and crinkled it up and that's what's inside my DIY burlap pumpkin.

These festive fall decorations are really easy and take no more than 5 minutes.  Just fill a plastic shopping back with balled up junk mail, newspaper or other plastic bags and tie the bag tight at the top.

Wednesday, October 2, 2013

Master Bathroom Renovations Tour {and my purchase list}

I'm so excited to finally be able to say we have a start date for the renovations on our master bathroom.  This is definitely not a DIY project - although I'm sure it will produce a few. 

Basically we are expanding our bathroom to make enough room for a double vanity ending our twice daily ritual of the toothbrush/facewash/hair styling dance around the mirror and sink.

When we first thought about making renovations to the bathroom we were told it would be major construction (and cost) and would entail cutting and bumping into the guest room which shares a wall with our master bathroom.  But I'm happy to say we've figured out a way to not disrupt the bathroom at all except for the vanity area.   Okay so...here's a little looksy look into what's happening.

Here's our master bathroom now.


Small single vanity
You can see it's pretty small and storage is minimal. 

Tuesday, October 1, 2013

DIY M&M Halloween Costume with Matching Hair Bows

A few Halloweens back my then-two year old daughter wanted to be an orange M&M. (This was a definite nod to her potty training incentive.) I whipped up a little costume for her - complete with M&M hair bows and it was adorable and very easy to make.   I'll try to explain as best as I can without my usual step-by-step photos to go along with what I'm talking about.

Supply list: 
  • 2 Yards of fabric in your choice of M&M colors
  • A quarter yard of white felt or two felt pieces 
  • Spray adhesive (If your felt is not self-adhesive.  I recommend not using the self-adhesive felt.)
  • Sewing machine
  • Coordinating thread
  • Fiber Stuffing
Start by cutting out four circles.  They should all be the same size.  I made mine 20" in diameter...but feel free to adjust smaller or large depending on the age and size of your child (or yourself...hehe).

Once you have all four circles cut out, cut two strips about 9" long and 2.5" wide.  These will be the shoulder straps.  Fold each strip in half longways so it's now about 1.25" wide.  Sew together the two edges and flip the strap right side out so the seam is on the inside.   Repeat on the other strap.  Leave the straps to the side for now.