

So when a friend had a baby recently I thought - ya know, I wanna be the one that gives that gift. Of course, I had to make it. Honestly the basic chunky wood sign was easy to make. All that text did make the project a little hairy at times, but I have a few tips to make it easier.
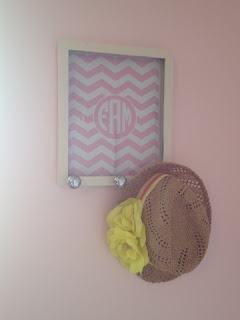
I purchased a basic wood frame and a smaller frame for the center at my local craft store. Using the two frames together just gives it that chunkier feel that I really like.

The first thing I did was paint both the frames. I tried spray painting the white one initially, but it was just not working. I think the weather is too cold for spray paint right now. I ended up just painting it with white acrylic craft paint and sanded it down along the bumpy area to give it some dimension.

The larger frame I painted in the mint green chalk paint I had left over from the dresser drawer to storage box project.
Once the green paint was dry, I used my Silhouette to design and cut my stencil.

If you don't have a die cut machine, no worries. You can easily get the same effect with letter stickers, thickers, or even stamps. (I did something very similar here using thickers.) Any areas that didn't get filled with text, I filled in with some cute baby items. It's not perfect by any means, but if you are painting on the design, sanding it lightly after the paint is dry will help smooth it out. TIP: You may want to place the smaller frame down on the larger frame and lightly trace around it so you have a 'safe zone'. This will prevent any words from being covered when you permanently attach the center frame.

Before I put the two frames together I cut a square of wrapping paper to size and mod podged it in the middle where the picture will go.

I used a hot glue gun to attach the smaller frame to the larger one.


I really love how it turned out and it's so personal and totally customizable!

Here are a few more DIY baby gifts you may enjoy...
.JPG&container=blogger&gadget=a&rewriteMime=image%2F*)

Thanks for stopping by 2IY! If you like what you see, we'd love for you to pin it!


I can't get enough of the Incredibox Colorbox Mustard edition. It’s perfect for both casual players and serious music enthusiasts. Great job, developers!
ReplyDeleteClick non-stop to get the highest score and overcome challenges in chill guy!
ReplyDeleteThis is a wonderful DIY project idea! Creating a Chunky Wood Frame as a personalized baby gift is both thoughtful and bitlife simulator creative.
ReplyDeleteGolf Orbit is a fun and hard game in which you must guide a golf ball over imaginative obstacles in varied environments. With visually appealing visuals and simple gameplay, you can put your timing and arithmetic abilities to the test.
ReplyDeleteI was actually browsing for the best electrical estimating software when I came across this post, and I’m so glad I did! Your DIY chunky wood frame tutorial is super detailed and inspiring—it makes me want to try a personalized project of my own. Love how you broke it down step by step while still keeping it fun and creative!
ReplyDeleteI love this DIY frame! It's as fun as playing free online games.
ReplyDelete